
When authoring workflows, it is a best practice to provide feedback on the status of the workflow as it moves thru the process. Both workflow authoring environments (Visual Studio and SharePoint Designer) contain built-in activities/actions to update the status. This article will review those activities, highlighting the differences between them and an approach for implementing the same behavior in both environments.
This article will not go into details on the Workflow architecture and configuration for SharePoint 2013. For more details on those subjects, I recommend reading the blog of my friend Andrew Connell as well as his workflow courses on Pluralsight.
If you got here looking to resolve the error "the referenced component microsoft.sharepoint.designtime.activities could not be found" then you need to update the references in your Visual Studio Solution. See Andrew Connell's post.
Example Workflow
For this article, I am referencing a workflow that will route a list item through two approval tasks serially. The second task is only created if the outcome of the first task is approved. The workflow will set the status as it moves thru each activity/action: Pending Task 1, Rejected in Task 1, Pending Task 2, Rejected in Task 2, or Approved. The example workflow (and this article) is not intended to demonstrate the best practices for an approval workflow. Accordingly, I’ve coded no details on the tasks nor specific activities to perform on an approved item. The workflow is shown in Visual Studio (Figure 1) and in SharePoint Designer (Figure 2).
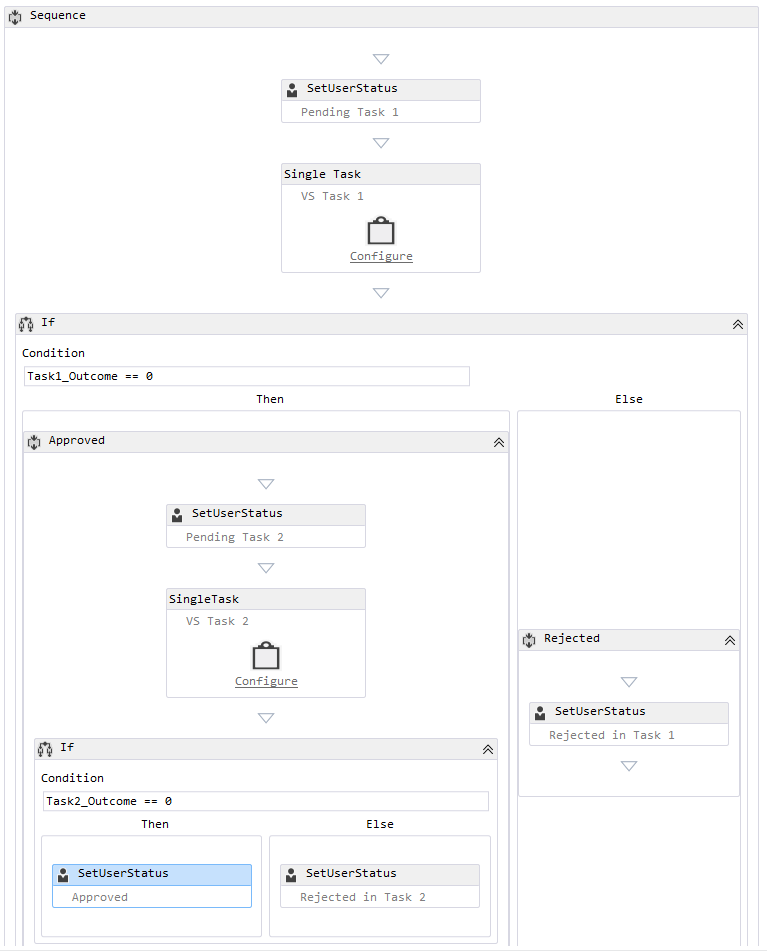
Figure 1 – Example workflow in Visual Studio 2012
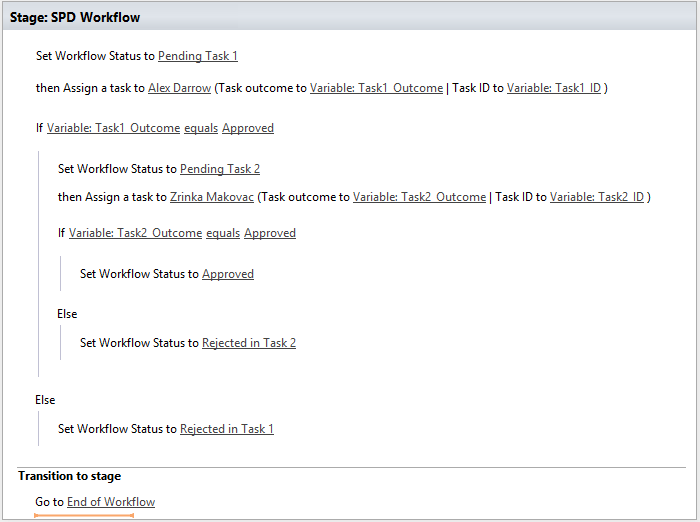
Figure 2 – Example workflow in SharePoint Designer 2013
Workflow Status in Visual Studio
In the default Visual Studio configuration for SharePoint workflows, the toolbox has an activity titled “SetUserStatus” that is in the “Runtime” tab (Figure 3). The activity has a single property, which is the text to set as the status. Workflows also have an internal status property, which is why the activity is titled SetUserStatus. Both of the status properties are displayed on the Workflow Status page in SharePoint (Figure 5).In the default Visual Studio configuration for SharePoint workflows, the toolbox has an activity titled “SetUserStatus” that is in the “Runtime” tab (Figure 3). The activity has a single property, which is the text to set as the status. Workflows also have an internal status property, which is why the activity is titled SetUserStatus. Both of the status properties are displayed on the Workflow Status page in SharePoint (Figure 5).
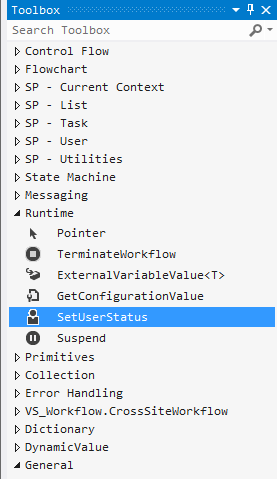
Figure 3 – Visual Studio Toolbox
After creating and deploying the Visual Studio workflow, I associated it with a list. When the association is performed via the browser, a column is added to the default view that reflects the workflow outcome. In Figure 4, you can see the column titled "VSWorkflow" and the value is initially blank.
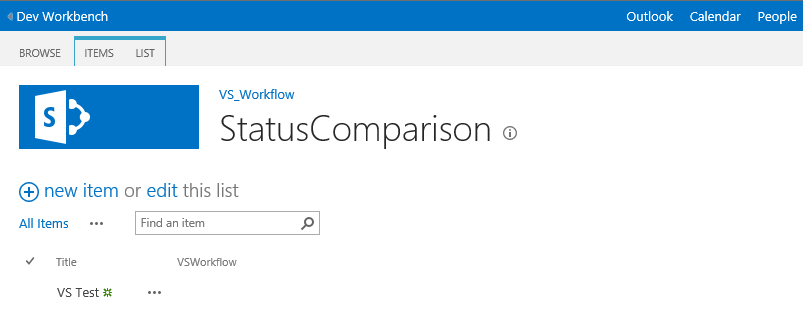
Figure 4 - Default view of list with Visual Studio workflow associated
Once the workflow is started, it creates a task and waits for that task to be updated (Approved, Rejected). These details are shown on the workflow status page for the item (Figure 5).
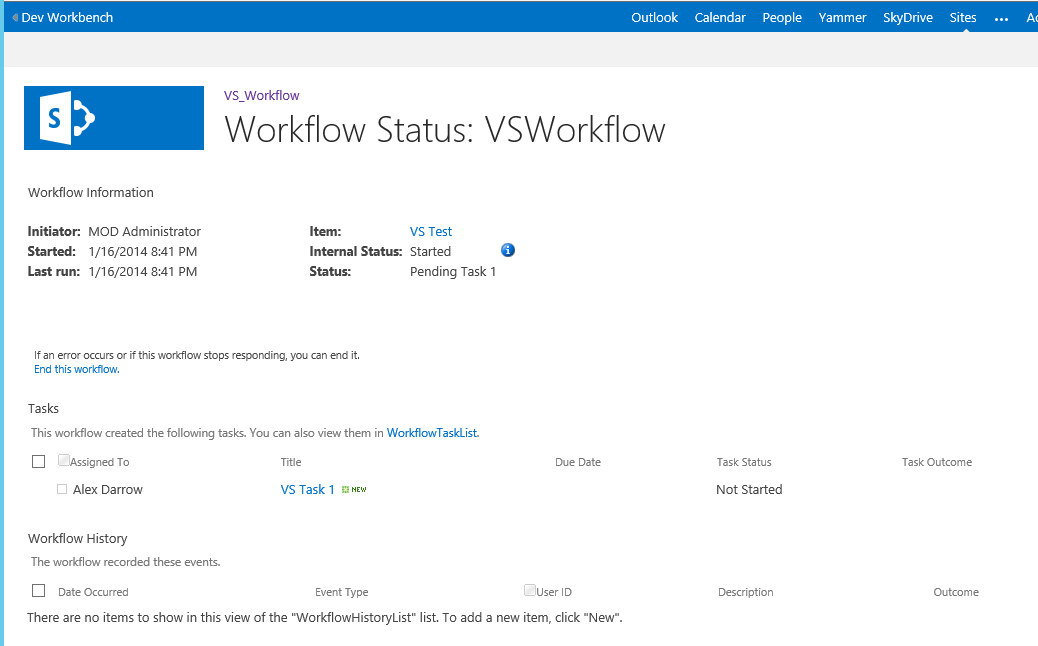
Figure 5 – VS Workflow status page: Pending Task 1
At the top of the status page, notice that there is a “Status” property and an “Internal Status” property. The “SetUserStatus” activity in Visual Studio will update the “Status” property. One drawback of the SetUserStatus activity is that it does not update the column on the list. Even though the status is set to the message we coded, the list view shows no indication that the workflow is running. In fact, while the status page for an item is updated throughout the workflow (Figure 6), the list column does not change. If we wish to save some clicks for our users, we need to extend our workflow to update the list item.
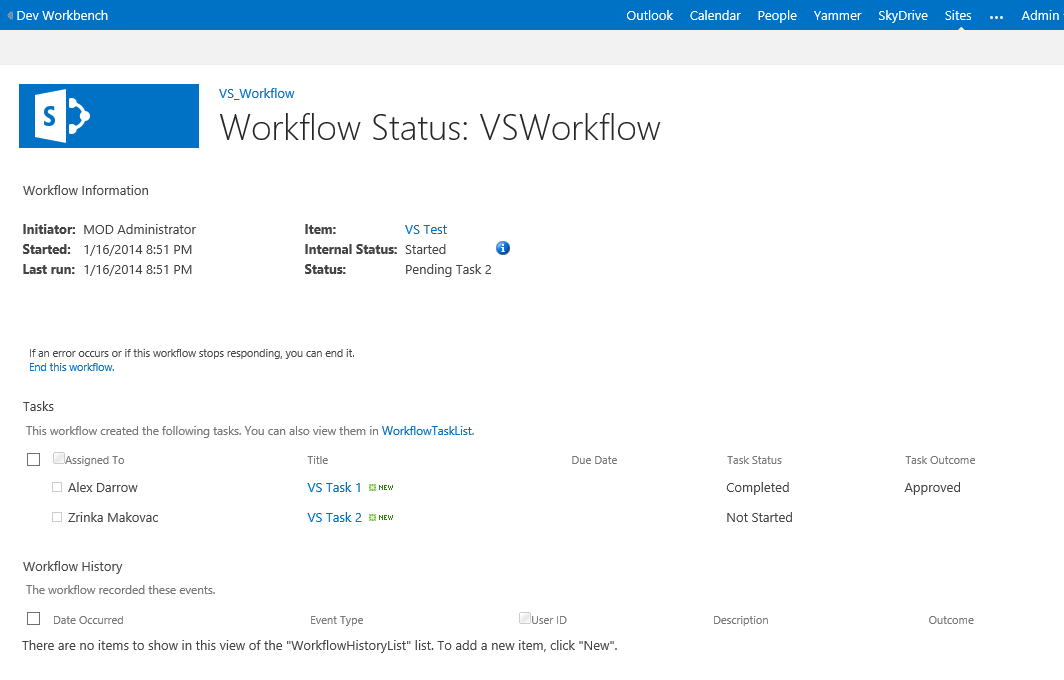
Figure 6 – VS Workflow status page: Pending Task 2
Workflow Status in SharePoint Designer
In our example SharePoint Designer-authored workflow (Figure 2), the Set Workflow Status action is used to provide feedback to our users. The Set Workflow Status action is in the Core Actions group (Figure 7).
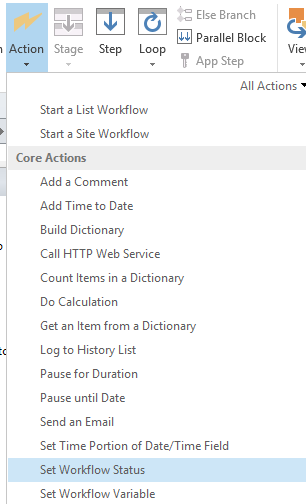
Figure 7 – SharePoint Designer Actions
With the Set Workflow Status action, the Workflow status page is updated just as we saw in the Visual Studio example (Figure 8). In addition, the list column is updated with the same status message (Figure 9). Updating the list column provides an at-a-glance view of the progress of items through workflows. This is incredibly useful if multiple list items have workflows in progress.
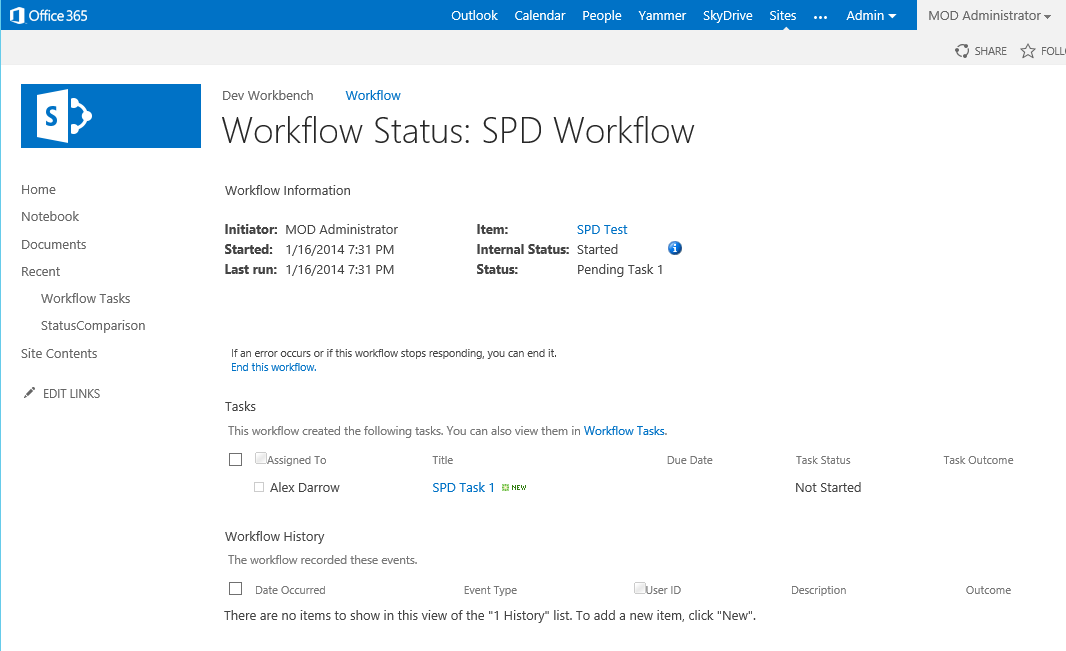
Figure 8 – SPD Workflow Status Page: Pending Task 1
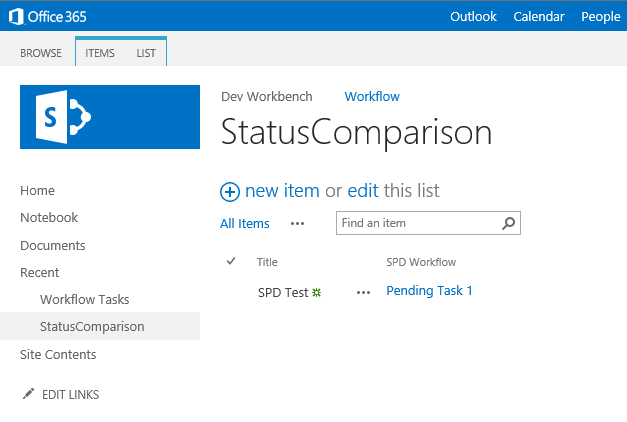
Figure 9 – SPD Workflow status in list view
Replicating the SharePoint Designer behavior in Visual Studio
As we can see, the SharePoint Designer Action provides more functionality than the Visual Studio Activity. If we want to replicate that behavior in Visual Studio, we have to do more work. Fortunately, there is a very simple task we can perform to leverage the SharePoint Designer actions.
One of the capabilities of Visual Studio that is not often discussed in SharePoint discussions is that the tool box is customizable. Right-clicking on a tab (the collapsible node in the Toolbox) shows a context menu that includes an option to Choose Items (Figure 10).
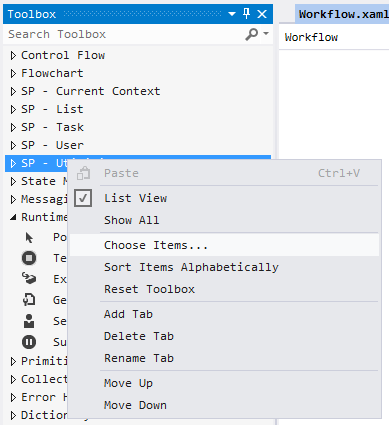
Figure 10 – Customizing the Visual Studio toolbox
By default, the Workflow toolbox includes activities from the Microsoft.SharePoint.DesignTime.Activities assembly. From the Choose Toolbox Items dialog, you can browse to the {SharePointRoot}\15\TEMPLATE\WorkflowActivities folder and select the Microsoft.SharePoint.WorkflowServices.Activities assembly. This assembly contains the Actions that are shown in SharePoint Designer, and more importantly this assembly is included in all on-premises installations of SharePoint 2013 and also in the Office 365 servers.
Once the assembly is chosen, the activities (actions) it contains are available for inclusion in the Visual Studio toolbox. There are quite a few of them available, as shown in Figure 11.
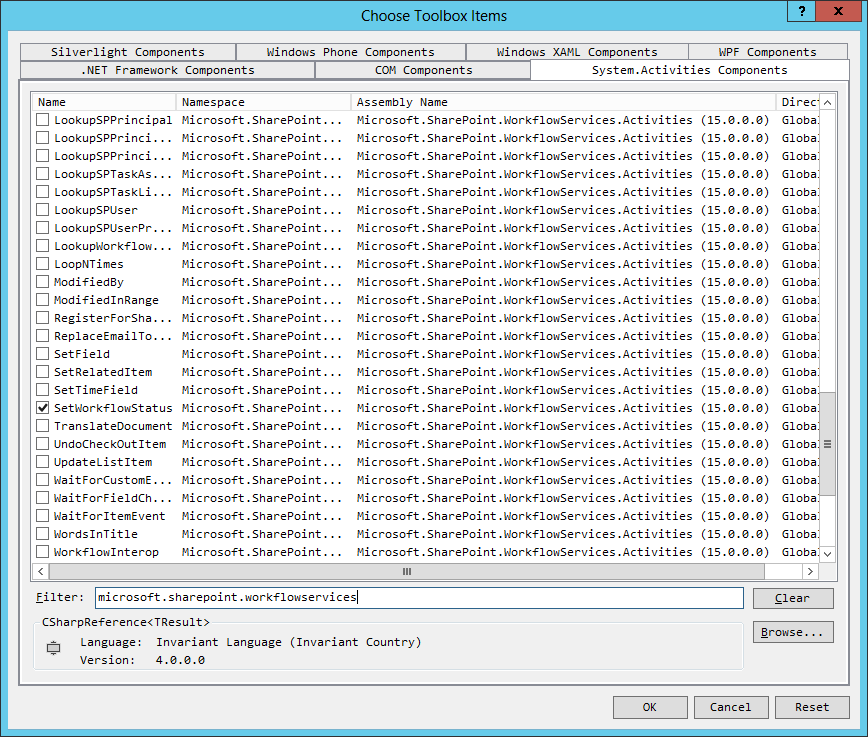
Figure 11 – Choose Toolbox Items dialog
I selected the SetWorkflowStatus activity to add to my toolbox. A word of caution – I do not believe that all of the activities will work as expected. These classes are not documented, so there may be some state that is set in workflows authored in SharePoint Designer that is required of these activities.
Clicking OK on the dialog will update the Toolbox in Visual Studio. I replaced the first SetUserStatus activity with a SetWorkflowStatus activity and then re-deployed the workflow. As show in Figure 12, the list column is updated with the status, just like in SharePoint Designer.
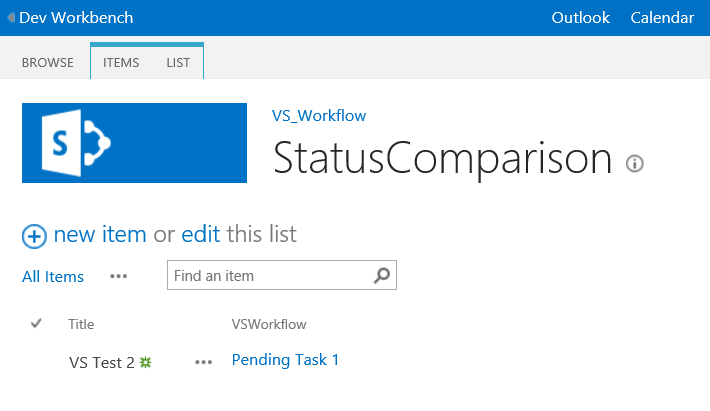
Figure 12 – Visual Studio Workflow list view with column updated
Summary
Customizing the Visual Studio toolbox can help in the development of workflows for SharePoint 2013. Since workflows authored in both environments are executed by the same Workflow Manager environment, the actions in SharePoint Designer can be used as activities in Visual Studio.