
Recently, I was asked how to automate a process to request and approve external users having access to content inside an Office 365 Group. I am documenting an approach to solving this scenario using Microsoft's Cloud services in a series of blog posts. Each post will address part of the scenario from a different perspective and will discuss different technologies. The series contains the following posts:
- Overview of scenario and technologies
- Administrator - Configure tenant policies for groups and sharing
- End User - Make requests to add external users and monitor status
- Manager - Review and process requests
- Developer - Fill gaps in process via custom web service (this post)
Automating the Invitation process
Our process requires an action that is not provided in Flow - creating an entry in Azure Active Directory for the external user. The account can be added manually in the Azure portal, but this approach will certainly not scale. This action can be automated using the Azure AD B2B service. AAD B2B is exposed thru the Microsoft Graph as the Invitation Manager. (Invitation Manager is currently in beta.)
From the documentation:
Use the invitation manager to create an invite, in order to add an external user to the organization.
The invitation process uses the following flow:
- An invitation is created
- An invitation is sent to the invited user (containing an invitation link)
- The invited user clicks on the invitation link, signs in and redeems the invitation and creation of the user entity representing the invited user completes
- The user is redirected to a specific page after redemption completes
This process meets our needs perfectly. We need a web service that can be called by Flow that will call the Invitation Manager API. Microsoft provides a tutorial for creating a custom Web API for Microsoft Flow. You can follow along with that tutorial, I will provide some additional details here.
Custom WebAPI
The custom WebAPI to call the Invitation manager is quite straightforward. The call to Create Invitation has only two required properties: the invited user email address and a redirect Url. (The call can include a display name as well. Display name is not included in the scenario for this series.)
The ExternalUserController of the WebAPI accepts an ExternalUserInvite object:
public class ExternalUserInvite
{
  [Required]
  public string invitedUserEmailAddress { get; set; }
  [Required]
  public string inviteRedirectUrl { get; set; }
}
The controller action serializes the invitation as JSON and calls the MS Graph endpoint.
[Authorize]
public class ExternalUsersController: ApiController
{
  public async Task<Invitation> Post(ExternalUserInvite invitation)
  {
    string apiUrl = $"{SettingsHelper.MSGraphResourceId}/beta/invitations";

    try
    {
      var requestObject = new Invitation
      {
        invitedUserEmailAddress = invitation.invitedUserEmailAddress,
        inviteRedirectUrl = invitation.inviteRedirectUrl,
        sendInvitationMessage = true
      };

      var requestBody = JsonConvert.SerializeObject(
                          requestObject,
                          null,
                          new JsonSerializerSettings
                          {
                            ContractResolver = new CamelCasePropertyNamesContractResolver()
                          }
                        );

      var responseContent = await Utils.HttpHelper.PostHttpResource(apiUrl, requestBody);
      var response = JsonConvert.DeserializeObject<Invitation>(responseContent);

      return response;
    }
    catch (WebException webException)
    {
      if (webException.Response != null)
      {
        using (var reader = new StreamReader(webException.Response.GetResponseStream()))
        {
          var responseContent = reader.ReadToEnd();
        }
      }

      var hre = new HttpResponseException(
                  new HttpResponseMessage
                  {
                    StatusCode = HttpStatusCode.InternalServerError,
                    ReasonPhrase = webException.Message
                  }
                );
      throw hre;
    }
    catch (Exception ex)
    {
      var hre = new HttpResponseException(
                  new HttpResponseMessage
                  {
                    StatusCode = HttpStatusCode.InternalServerError,
                    ReasonPhrase = ex.Message
                  }
                );
      throw hre;
    }
  }
}
Register the custom API
All requests to Microsoft Graph must be authorized. (The documentation discusses the authorization in depth.) In addition, the registered application must request permissions relevant to the operations they perform. The Create Invitation method requires Directory.ReadWrite.All or User.ReadWrite.All, both of which will require administrator consent. In addition, we must decide if the application will use Delegated permissions or Application permissions. Since the capability we are providing requires administrative privilege, and not every user has administrative privilege, application permissions are configured.
Our API does not require the typical user consent flow, nor does it require the permission to log in users. The application registration in Azure AD requests only the application permission Directory.ReadWrite.All,
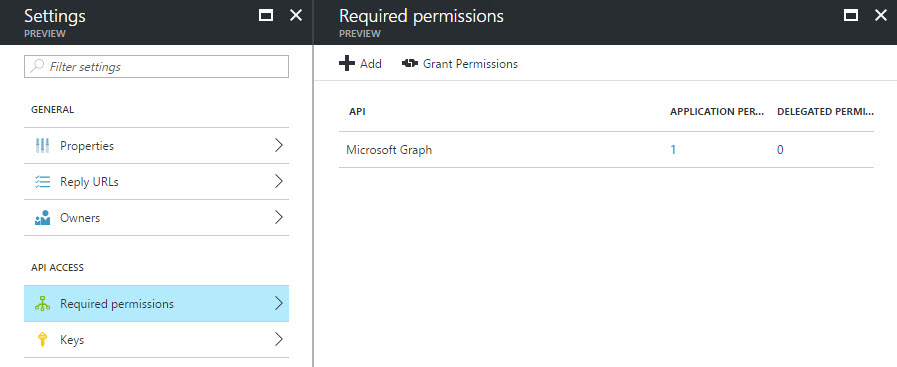
Figure 1
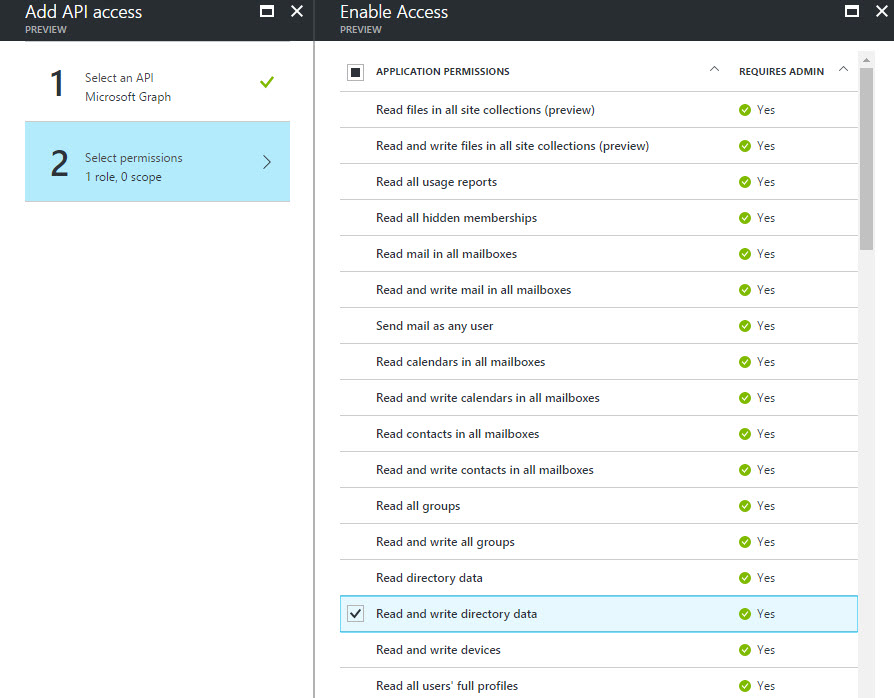
Figure 2
We can perform the admin consent in the Azure portal, since we do not have a user login flow.
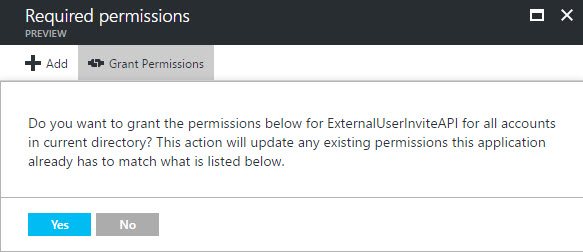
Figure 3
Secure the custom API
Once our API is registered in the Azure AD, we must configure the WebAPI to require a token issued from Azure AD. We don't want anonymous requests creating user accounts in our directory! We can use the OWIN libraries for Active Directory to ensure we have a token in calls to our service.
- Ensure you have the Microsoft.Owin.Security.ActiveDirectory package added to the solution.
- Add the
[Authorize]attribute to the controller or method - Specify the valid audience for the token:
public void ConfigureAuth(IAppBuilder app)
{
  app.UseWindowsAzureActiveDirectoryBearerAuthentication(
    new WindowsAzureActiveDirectoryBearerAuthenticationOptions
    {
      Tenant = ConfigurationManager.AppSettings["ida:Tenant"],
      TokenValidationParameters = new TokenValidationParameters
      {
        ValidAudience= "https://[domain]/[ApplicationId]"
      }
    }
  );
}
Proxy application registration
The flow tutorial walks thru registering a second application in Azure AD. While not strictly necessary, this is prescribed as a best practice. In a production scenario, it is likely the API will be consumed by a process that is not Flow. Or there may be two different roles that have different authorization policies. Or the API requires a separation by client to facilitate revocation or white-listing. There can be many other reasons as well.
The second application registration in the Flow tutorial has a reply URL of https://msmanaged-na.consent.azure-apim.net/redirect. The redirect URL points to the secure token store managed by the Flow/PowerApps ecosystem. The tokens are used to make on-behalf calls by PowerApps and Flow on-behalf of the user to the underlying service (in this case the Web API). In the Azure portal, the redirect URL is entered in the Reply URLs blade (Figure 4)

Figure 4
The proxy application must have access to the web API. In the Required Permissions blade, the web API will not be shown. The application name must be entered manually, then selected from the list (Figures 5-7).
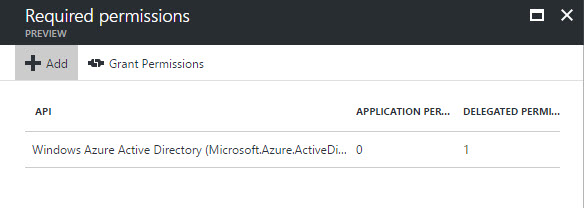
Figure 5

Figure 6
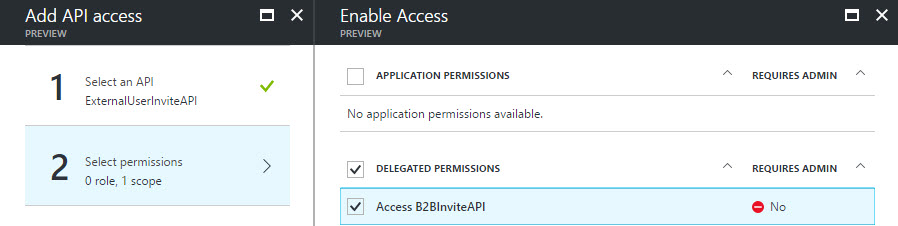
Figure 7
Describe the API using Swagger
For an API to be consumable by Flow, it must be described using the Swagger specification. WebAPI projects can leverage the Swashbuckle library to auto-generate the specification document. The OAuth2 pieces need a bit of extra work as described by Bill Pratt. I had to change his IOperationFilter class because the GetCustomAttributes method was not returning my action method:
public class AssignOAuth2SecurityRequirements : IOperationFilter
{
  public void Apply(Operation operation, SchemaRegistry schemaRegistry, ApiDescription apiDescription)
  {
    // Original code
    //// Determine if the operation has the Authorize attribute
    //var authorizeAttributes = apiDescription
    //		.ActionDescriptor.GetCustomAttributes<AuthorizeAttribute>();

    //if (!authorizeAttributes.Any())
    //	return;

    // Revised code
    var actFilters = apiDescription.ActionDescriptor.GetFilterPipeline();
    var allowsAnonymous = actFilters.Select(f => f.Instance)
                                    .OfType<OverrideAuthorizationAttribute>().Any();
    if (allowsAnonymous)
      return;

    // Initialize the operation.security property
    if (operation.security == null)
      operation.security = new List<IDictionary<string, IEnumerable<string>>>();

    // Add the appropriate security definition to the operation
    var oAuthRequirements = new Dictionary<string, IEnumerable<string>>
    {
      { "AAD", Enumerable.Empty<string>() }
    };

    operation.security.Add(oAuthRequirements);
}
My Swagger configuration:
GlobalConfiguration.Configuration
  .EnableSwagger(c =>
  {
    c.Schemes(new[] { "https" });
    c.SingleApiVersion("v1", "ExternalUserInviteAPI");
    c.OAuth2("AAD")
      .Flow("accessCode")
      .AuthorizationUrl($"https://login.windows.net/{TenantId}/oauth2/authorize");
    c.OperationFilter<Infrastructure.AssignOAuth2SecurityRequirements>();
});
After coding these changes, you should download a copy of the Swagger document from your development environment. Once it is deployed to Azure, viewing the document will require a token, which would require a client application. It is much easier to simply modify the file generated in development. The document is at [host]/swagger/docs/v1.
Deploy and configure Azure App Service (Web App)
The Web API must be accessible from the internet. Using an Azure App Service is the natural place, since the directory is in Azure as well. Once the App Service is provisioned, and the code deployed, the Authentication/Authorization settings must be updated.
When configuration the Web App, the application to select is the Web API (not the proxy). I did not have luck selecting an existing app registration. Rather I needed to enter the App Id directly. For the Issuer Url property, enter https://sts.windows.net/[tenant-id].
Create Custom API in Flow
With our API written, secure and described by Swagger, we are ready to create a Custom API in the Flow service. The steps in the tutorial are pretty straightforward. When creating the connection, the user account must be in the same Azure Active Directory as the App Registrations. The actual user account will not matter, since the Web API makes an app-only connection to the directory.
The create process will generate an action that has the name made by concatenating the name of the custom API and the name of the action method in the code.
Use the Custom API in a Flow
With our custom API added and connected, we can use it in an action. In the Approve branch of the switch action, click Add an Action. Type the name of the custom API in the search box at the top of the "Choose an action" box. Then select the action (Figure 8).
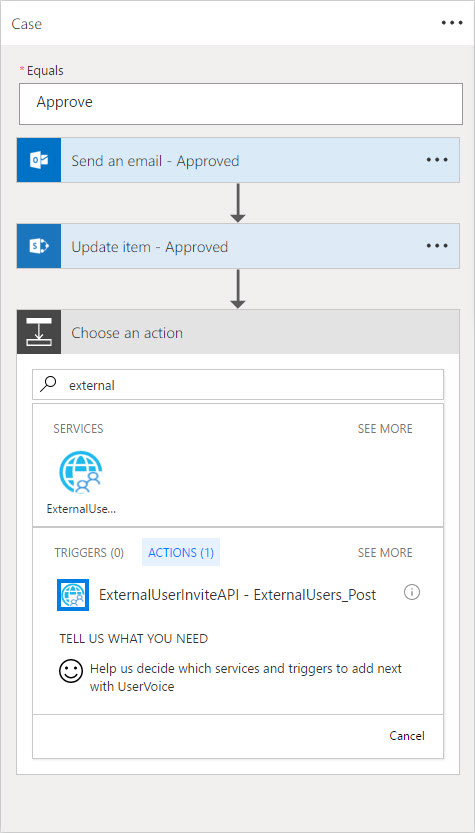
Figure 8
The Flow editor will display controls for the input parameters of the method. Populate these based on the properties in the Flow. (Refer to Part 4 for a discussion of creating/editing a Flow.) Note that the list in this sample does not have columns for display name and invite redirect Url. Specifying a Url directly in the action will cause the same value to be used for all "runs" of the flow. This is the intended behavior in the scenario.
Summary
Our Flow is complete, and the process is completely automated. We have connected a SharePoint list with our Active Directory and a custom WebAPI using the Flow service. The concepts presented here are portable to any custom API. This is quite powerful!